CI/CD for AKS Apps with GitHub Actions and GitFlow
This guide provides a comprehensive approach to implementing CI/CD pipelines for Azure Kubernetes Service (AKS) applications using GitHub Actions with a GitFlow branching strategy.
GitFlow Overview
GitFlow is a branching model that involves the following key branches:
- main/master: Production-ready code
- develop: Integration branch for features
- feature/*: New features
- release/*: Preparing for a release
- hotfix/*: Quick fixes to production
Implementation Options
Option 1: Push-based CI/CD
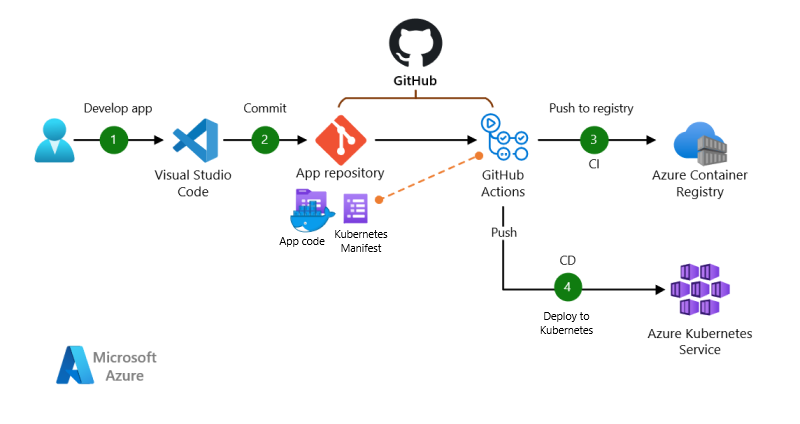
Push-based architecture with GitHub Actions for CI and CD.
Dataflow
This scenario covers a push-based DevOps pipeline for a two-tier web application, with a front-end web component and a back-end that uses Redis. This pipeline uses GitHub Actions for build and deployment. The data flows through the scenario as follows:
- The app code is developed.
- The app code is committed to a GitHub git repository.
- GitHub Actions builds a container image from the app code and pushes the container image to Azure Container Registry.
- A GitHub Actions job deploys, or pushes, the app to the Azure Kubernetes Service (AKS) cluster using kubectl deployment of the Kubernetes manifest files.
Option 2: Pull-based CI/CD (GitOps)
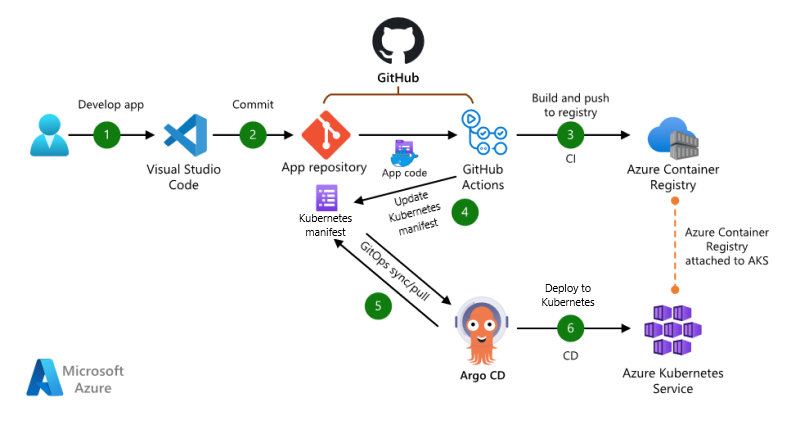
Pull-based architecture with GitHub Actions for CI and Argo CD for CD.
Download a Visio file of this architecture.
Dataflow
This scenario covers a pull-based DevOps pipeline for a two-tier web application, with a front-end web component and a back-end that uses Redis. This pipeline uses GitHub Actions for build. For deployment, it uses Argo CD as a GitOps operator to pull/sync the app. The data flows through the scenario as follows:
- The app code is developed.
- The app code is committed to a GitHub repository.
- GitHub Actions builds a container image from the app code and pushes the container image to Azure Container Registry.
- GitHub Actions updates a Kubernetes manifest deployment file with the current image version based on the version number of the container image in the Azure Container Registry.
- Argo CD syncs with, or pulls from, the Git repository.
- Argo CD deploys the app to the AKS cluster.
Prerequisites
Before implementing either pipeline, ensure you have:
- An Azure subscription with appropriate permissions
- Azure CLI installed and configured
- GitHub account with repository access
- AKS cluster provisioned
- Azure Container Registry (ACR) created and configured
- kubectl and Helm installed locally for testing
Repository Structure
For GitFlow with AKS deployments, organize your repository as follows:
├── .github/
│   └── workflows/
│       ├── ci-develop.yml         # CI for the develop branch
│       ├── ci-feature.yml         # CI for feature branches
│       ├── cd-staging.yml         # CD for staging environment from develop
│       └── cd-production.yml      # CD for production environment from main
├── src/                           # Application source code
│   ├── frontend/
│   └── backend/
├── manifests/                     # Kubernetes manifests
│   ├── base/                      # Base configurations
│   │   ├── deployment.yaml
│   │   ├── service.yaml
│   │   └── configmap.yaml
│   └── environments/              # Environment-specific configurations
│       ├── dev/
│       │   └── kustomization.yaml
│       ├── staging/
│       │   └── kustomization.yaml
│       └── production/
│           └── kustomization.yaml
├── charts/                        # Helm charts (optional)
│   └── my-application/
└── README.md
Push-Based Implementation (Option 1)
Step 1: Set Up GitHub Secrets
Navigate to your GitHub repository → Settings → Secrets and add the following secrets:
AZURE_CREDENTIALS: JSON credentials for Azure service principalACR_NAME: Name of your Azure Container RegistryAKS_CLUSTER_NAME: Name of your AKS clusterAKS_RESOURCE_GROUP: Resource group containing your AKS cluster
Step 2: Create the CI Workflow for Feature Branches
Create .github/workflows/ci-feature.yml:
name: Feature Branch CI

on:
  push:
    branches:
      - 'feature/**'
  pull_request:
    branches:
      - develop

jobs:
  build-and-test:
    runs-on: ubuntu-latest
    steps:
      - name: Checkout code
        uses: actions/checkout@v3

      - name: Set up Docker Buildx
        uses: docker/setup-buildx-action@v2

      - name: Build and test frontend
        run: |
          cd src/frontend
          npm ci
          npm run test
          npm run lint

      - name: Build and test backend
        run: |
          cd src/backend
          npm ci
          npm run test
          npm run lint
Step 3: Create the CI/CD Workflow for the Develop Branch
Create .github/workflows/ci-develop.yml:
name: Develop Branch CI/CD

on:
  push:
    branches:
      - develop

jobs:
  build-and-push:
    runs-on: ubuntu-latest
    steps:
      - name: Checkout code
        uses: actions/checkout@v3

      - name: Azure login
        uses: azure/login@v1
        with:
          creds: ${{ secrets.AZURE_CREDENTIALS }}

      - name: Set up Docker Buildx
        uses: docker/setup-buildx-action@v2

      - name: Login to ACR
        uses: docker/login-action@v2
        with:
          registry: ${{ secrets.ACR_NAME }}.azurecr.io
          username: ${{ secrets.AZURE_CLIENT_ID }}
          password: ${{ secrets.AZURE_CLIENT_SECRET }}

      - name: Extract branch name and short SHA
        shell: bash
        run: |
          echo "##[set-output name=branch;]$(echo ${GITHUB_REF#refs/heads/})"
          echo "##[set-output name=sha_short;]$(git rev-parse --short HEAD)"
        id: extract_branch

      - name: Build and push frontend image
        uses: docker/build-push-action@v3
        with:
          context: ./src/frontend
          push: true
          tags: |
            ${{ secrets.ACR_NAME }}.azurecr.io/frontend:${{ steps.extract_branch.outputs.branch }}-${{ steps.extract_branch.outputs.sha_short }}
            ${{ secrets.ACR_NAME }}.azurecr.io/frontend:latest-dev

      - name: Build and push backend image
        uses: docker/build-push-action@v3
        with:
          context: ./src/backend
          push: true
          tags: |
            ${{ secrets.ACR_NAME }}.azurecr.io/backend:${{ steps.extract_branch.outputs.branch }}-${{ steps.extract_branch.outputs.sha_short }}
            ${{ secrets.ACR_NAME }}.azurecr.io/backend:latest-dev

      - name: Set AKS context
        uses: azure/aks-set-context@v1
        with:
          creds: ${{ secrets.AZURE_CREDENTIALS }}
          resource-group: ${{ secrets.AKS_RESOURCE_GROUP }}
          cluster-name: ${{ secrets.AKS_CLUSTER_NAME }}

      - name: Deploy to dev namespace
        uses: azure/k8s-deploy@v1
        with:
          namespace: dev
          manifests: |
            manifests/environments/dev/kustomization.yaml
          images: |
            ${{ secrets.ACR_NAME }}.azurecr.io/frontend:${{ steps.extract_branch.outputs.branch }}-${{ steps.extract_branch.outputs.sha_short }}
            ${{ secrets.ACR_NAME }}.azurecr.io/backend:${{ steps.extract_branch.outputs.branch }}-${{ steps.extract_branch.outputs.sha_short }}
Step 4: Create the CD Workflow for Production
Create .github/workflows/cd-production.yml:
name: Production Deployment

on:
  push:
    branches:
      - main

jobs:
  deploy-production:
    runs-on: ubuntu-latest
    steps:
      - name: Checkout code
        uses: actions/checkout@v3

      - name: Azure login
        uses: azure/login@v1
        with:
          creds: ${{ secrets.AZURE_CREDENTIALS }}

      - name: Set up Docker Buildx
        uses: docker/setup-buildx-action@v2

      - name: Login to ACR
        uses: docker/login-action@v2
        with:
          registry: ${{ secrets.ACR_NAME }}.azurecr.io
          username: ${{ secrets.AZURE_CLIENT_ID }}
          password: ${{ secrets.AZURE_CLIENT_SECRET }}

      - name: Extract version
        shell: bash
        run: |
          VERSION=$(grep -oP '(?<="version": ")[^"]*' package.json)
          echo "##[set-output name=version;]${VERSION}"
        id: extract_version

      - name: Build and push frontend image with version tag
        uses: docker/build-push-action@v3
        with:
          context: ./src/frontend
          push: true
          tags: |
            ${{ secrets.ACR_NAME }}.azurecr.io/frontend:${{ steps.extract_version.outputs.version }}
            ${{ secrets.ACR_NAME }}.azurecr.io/frontend:stable
            ${{ secrets.ACR_NAME }}.azurecr.io/frontend:latest

      - name: Build and push backend image with version tag
        uses: docker/build-push-action@v3
        with:
          context: ./src/backend
          push: true
          tags: |
            ${{ secrets.ACR_NAME }}.azurecr.io/backend:${{ steps.extract_version.outputs.version }}
            ${{ secrets.ACR_NAME }}.azurecr.io/backend:stable
            ${{ secrets.ACR_NAME }}.azurecr.io/backend:latest

      - name: Set AKS context
        uses: azure/aks-set-context@v1
        with:
          creds: ${{ secrets.AZURE_CREDENTIALS }}
          resource-group: ${{ secrets.AKS_RESOURCE_GROUP }}
          cluster-name: ${{ secrets.AKS_CLUSTER_NAME }}

      - name: Deploy to production namespace
        uses: azure/k8s-deploy@v1
        with:
          namespace: production
          manifests: |
            manifests/environments/production/kustomization.yaml
          images: |
            ${{ secrets.ACR_NAME }}.azurecr.io/frontend:${{ steps.extract_version.outputs.version }}
            ${{ secrets.ACR_NAME }}.azurecr.io/backend:${{ steps.extract_version.outputs.version }}
Step 5: Kubernetes Base Manifests
Create your base Kubernetes manifests in the manifests/base/ directory.
Example deployment manifest (manifests/base/deployment.yaml):
apiVersion: apps/v1
kind: Deployment
metadata:
  name: frontend
spec:
  replicas: 3
  selector:
    matchLabels:
      app: frontend
  template:
    metadata:
      labels:
        app: frontend
    spec:
      containers:
      - name: frontend
        image: frontend:latest
        ports:
        - containerPort: 80
        resources:
          requests:
            cpu: 100m
            memory: 128Mi
          limits:
            cpu: 250m
            memory: 256Mi
        livenessProbe:
          httpGet:
            path: /health
            port: 80
          initialDelaySeconds: 30
          periodSeconds: 10
        readinessProbe:
          httpGet:
            path: /ready
            port: 80
          initialDelaySeconds: 5
          periodSeconds: 5
---
apiVersion: apps/v1
kind: Deployment
metadata:
  name: backend
spec:
  replicas: 2
  selector:
    matchLabels:
      app: backend
  template:
    metadata:
      labels:
        app: backend
    spec:
      containers:
      - name: backend
        image: backend:latest
        ports:
        - containerPort: 3000
        env:
        - name: REDIS_HOST
          value: redis-service
        resources:
          requests:
            cpu: 100m
            memory: 128Mi
          limits:
            cpu: 250m
            memory: 256Mi
Step 6: Environment-Specific Kustomization
Create environment-specific configurations using Kustomize.
Example for development (manifests/environments/dev/kustomization.yaml):
apiVersion: kustomize.config.k8s.io/v1beta1
kind: Kustomization

resources:
  - ../../base

namespace: dev

commonLabels:
  environment: development

replicas:
  - name: frontend
    count: 1
  - name: backend
    count: 1

images:
  - name: frontend
    newName: your-acr-name.azurecr.io/frontend
    newTag: latest-dev
  - name: backend
    newName: your-acr-name.azurecr.io/backend
    newTag: latest-dev
Example for production (manifests/environments/production/kustomization.yaml):
apiVersion: kustomize.config.k8s.io/v1beta1
kind: Kustomization

resources:
  - ../../base

namespace: production

commonLabels:
  environment: production

replicas:
  - name: frontend
    count: 3
  - name: backend
    count: 2

images:
  - name: frontend
    newName: your-acr-name.azurecr.io/frontend
    newTag: stable
  - name: backend
    newName: your-acr-name.azurecr.io/backend
    newTag: stable
Pull-Based (GitOps) Implementation (Option 2)
Step 1: Set Up Argo CD in Your AKS Cluster
Install Argo CD:
kubectl create namespace argocd
kubectl apply -n argocd -f https://raw.githubusercontent.com/argoproj/argo-cd/stable/manifests/install.yaml
Forward the Argo CD API server:
kubectl port-forward svc/argocd-server -n argocd 8080:443
Get the initial password:
kubectl -n argocd get secret argocd-initial-admin-secret -o jsonpath="{.data.password}" | base64 -d
Step 2: Create a Manifest Repository
Create a separate Git repository for your Kubernetes manifests. This separation of application code and configuration is a GitOps best practice.
Structure your manifest repository as follows:
├── apps/
│   ├── frontend/
│   │   ├── base/
│   │   │   ├── deployment.yaml
│   │   │   ├── service.yaml
│   │   │   └── kustomization.yaml
│   │   └── overlays/
│   │       ├── dev/
│   │       │   └── kustomization.yaml
│   │       ├── staging/
│   │       │   └── kustomization.yaml
│   │       └── production/
│   │           └── kustomization.yaml
│   └── backend/
│       ├── base/
│       │   ├── deployment.yaml
│       │   ├── service.yaml
│       │   └── kustomization.yaml
│       └── overlays/
│           ├── dev/
│           │   └── kustomization.yaml
│           ├── staging/
│           │   └── kustomization.yaml
│           └── production/
│               └── kustomization.yaml
└── applications.yaml
Step 3: Configure CI to Update Image Tags
Create .github/workflows/ci-update-manifests.yml in your application repository:
name: Update Kubernetes Manifests

on:
  push:
    branches:
      - develop
      - main

jobs:
  build-and-update:
    runs-on: ubuntu-latest
    steps:
      - name: Checkout application code
        uses: actions/checkout@v3

      - name: Azure login
        uses: azure/login@v1
        with:
          creds: ${{ secrets.AZURE_CREDENTIALS }}

      - name: Set up Docker Buildx
        uses: docker/setup-buildx-action@v2

      - name: Login to ACR
        uses: docker/login-action@v2
        with:
          registry: ${{ secrets.ACR_NAME }}.azurecr.io
          username: ${{ secrets.AZURE_CLIENT_ID }}
          password: ${{ secrets.AZURE_CLIENT_SECRET }}

      - name: Extract branch and SHA
        shell: bash
        run: |
          BRANCH=${GITHUB_REF#refs/heads/}
          SHA_SHORT=$(git rev-parse --short HEAD)
          echo "BRANCH=${BRANCH}" >> $GITHUB_ENV
          echo "SHA_SHORT=${SHA_SHORT}" >> $GITHUB_ENV
          if [[ "$BRANCH" == "main" ]]; then
            echo "ENV=production" >> $GITHUB_ENV
          elif [[ "$BRANCH" == "develop" ]]; then
            echo "ENV=dev" >> $GITHUB_ENV
          fi

      - name: Build and push images
        uses: docker/build-push-action@v3
        with:
          context: ./src
          push: true
          tags: ${{ secrets.ACR_NAME }}.azurecr.io/myapp:${{ env.BRANCH }}-${{ env.SHA_SHORT }}

      - name: Checkout manifests repository
        uses: actions/checkout@v3
        with:
          repository: your-org/k8s-manifests
          path: k8s-manifests
          token: ${{ secrets.PAT_TOKEN }}  # Personal access token with repo scope

      - name: Update image tag in manifests
        run: |
          cd k8s-manifests/apps/myapp/overlays/${{ env.ENV }}
          kustomize edit set image myapp=${{ secrets.ACR_NAME }}.azurecr.io/myapp:${{ env.BRANCH }}-${{ env.SHA_SHORT }}

      - name: Commit and push changes
        run: |
          cd k8s-manifests
          git config --local user.email "action@github.com"
          git config --local user.name "GitHub Action"
          git add .
          git commit -m "Update image tag for ${{ env.ENV }} to ${{ env.BRANCH }}-${{ env.SHA_SHORT }}"
          git push
Step 4: Create Argo CD Applications
Define your applications in Argo CD by creating an applications.yaml file:
apiVersion: argoproj.io/v1alpha1
kind: Application
metadata:
  name: frontend-dev
  namespace: argocd
spec:
  project: default
  source:
    repoURL: https://github.com/your-org/k8s-manifests.git
    targetRevision: HEAD
    path: apps/frontend/overlays/dev
  destination:
    server: https://kubernetes.default.svc
    namespace: dev
  syncPolicy:
    automated:
      prune: true
      selfHeal: true
---
apiVersion: argoproj.io/v1alpha1
kind: Application
metadata:
  name: backend-dev
  namespace: argocd
spec:
  project: default
  source:
    repoURL: https://github.com/your-org/k8s-manifests.git
    targetRevision: HEAD
    path: apps/backend/overlays/dev
  destination:
    server: https://kubernetes.default.svc
    namespace: dev
  syncPolicy:
    automated:
      prune: true
      selfHeal: true
---
apiVersion: argoproj.io/v1alpha1
kind: Application
metadata:
  name: frontend-production
  namespace: argocd
spec:
  project: default
  source:
    repoURL: https://github.com/your-org/k8s-manifests.git
    targetRevision: HEAD
    path: apps/frontend/overlays/production
  destination:
    server: https://kubernetes.default.svc
    namespace: production
  syncPolicy:
    automated:
      prune: true
      selfHeal: false  # Manual approval for production
    syncOptions:
    - CreateNamespace=true
---
apiVersion: argoproj.io/v1alpha1
kind: Application
metadata:
  name: backend-production
  namespace: argocd
spec:
  project: default
  source:
    repoURL: https://github.com/your-org/k8s-manifests.git
    targetRevision: HEAD
    path: apps/backend/overlays/production
  destination:
    server: https://kubernetes.default.svc
    namespace: production
  syncPolicy:
    automated:
      prune: true
      selfHeal: false  # Manual approval for production
    syncOptions:
    - CreateNamespace=true
Apply the applications to Argo CD:
kubectl apply -f applications.yaml -n argocd
Security Best Practices
-
Scan Container Images for Vulnerabilities
Add a security scanning step to your CI workflow:
- name: Scan container image uses: aquasecurity/trivy-action@master with: image-ref: ${{ secrets.ACR_NAME }}.azurecr.io/frontend:${{ steps.extract_branch.outputs.sha_short }} format: 'table' exit-code: '1' ignore-unfixed: true severity: 'CRITICAL,HIGH' -
Use Workload Identity for Azure Authentication
Instead of storing service principal credentials, use OpenID Connect (OIDC) for GitHub Actions:
- name: Azure login with OIDC uses: azure/login@v1 with: client-id: ${{ secrets.AZURE_CLIENT_ID }} tenant-id: ${{ secrets.AZURE_TENANT_ID }} subscription-id: ${{ secrets.AZURE_SUBSCRIPTION_ID }} -
Implement Network Policies in AKS
Apply network policies to limit pod communication:
apiVersion: networking.k8s.io/v1 kind: NetworkPolicy metadata: name: frontend-policy namespace: production spec: podSelector: matchLabels: app: frontend policyTypes: - Ingress - Egress ingress: - from: - podSelector: matchLabels: app: ingress-nginx ports: - protocol: TCP port: 80 egress: - to: - podSelector: matchLabels: app: backend ports: - protocol: TCP port: 3000 -
Use Sealed Secrets for Sensitive Data
Install Sealed Secrets controller and encrypt your secrets:
# Install the controller
helm install sealed-secrets sealed-secrets --repo https://bitnami-labs.github.io/sealed-secrets

# Encrypt a secret
kubectl create secret generic my-secret --dry-run=client --from-literal=key=value -o yaml | \
  kubeseal --controller-namespace=default --controller-name=sealed-secrets > sealed-secret.yaml
Monitoring and Observability
-
Set up Azure Monitor for Containers
Enable Azure Monitor for your AKS cluster to collect metrics and logs:
az aks enable-addons -a monitoring -n your-aks-cluster -g your-resource-group -
Configure Application Insights
Add Application Insights to your applications for detailed application monitoring.
-
Set Up Prometheus and Grafana
Deploy Prometheus and Grafana to your cluster for enhanced monitoring:
helm repo add prometheus-community https://prometheus-community.github.io/helm-charts
helm install prometheus prometheus-community/kube-prometheus-stack \
  --namespace monitoring \
  --create-namespace
Automating GitFlow Operations
You can automate GitFlow operations with GitHub Actions:
-
Automating Feature Branch Creation
Create
.github/workflows/create-feature.yml:name: Create Feature Branch on: workflow_dispatch: inputs: feature_name: description: 'Feature name' required: true jobs: create-feature: runs-on: ubuntu-latest steps: - name: Checkout code uses: actions/checkout@v3 with: ref: develop - name: Create feature branch run: | git checkout -b feature/${{ github.event.inputs.feature_name }} git push -u origin feature/${{ github.event.inputs.feature_name }} -
Automating Release Creation
Create
.github/workflows/create-release.yml:name: Create Release Branch on: workflow_dispatch: inputs: version: description: 'Release version (e.g., 1.2.0)' required: true jobs: create-release: runs-on: ubuntu-latest steps: - name: Checkout code uses: actions/checkout@v3 with: ref: develop - name: Create release branch run: | git checkout -b release/v${{ github.event.inputs.version }} # Update version in package.json sed -i 's/"version": ".*"/"version": "${{ github.event.inputs.version }}"/' package.json git add package.json git commit -m "Bump version to ${{ github.event.inputs.version }}" git push -u origin release/v${{ github.event.inputs.version }}
Conclusion
By combining GitHub Actions with GitFlow branching and either push-based deployment or GitOps principles, you can create a robust CI/CD pipeline for your AKS applications. The choice between push-based and pull-based (GitOps) approaches depends on your team’s preferences, security requirements, and operational needs:
- Push-based provides simpler setup and direct control over deployments.
- Pull-based (GitOps) offers better security, audit trail, and automated drift detection.
Both approaches can be adapted to implement GitFlow’s branching strategy effectively, ensuring smooth progression from development to production while maintaining quality and stability.